Photo Black & Color
![]()
Introduction
Photo Black & Color allows partial desaturation on an image by selecting the colors to keep. Partial desaturation is preserving a colored subject and leaving the rest of the image in grayscale.
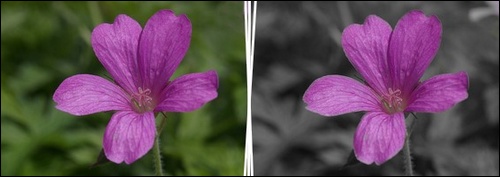
Example of partial desaturation from a flower photo
The user interface
Here is an overview of the Photo Black & Color user interface. Each numbered part is detailed below.
1. Open an image
This button loads an image into the Photo Black & Color workspace.
You can also start the function by:
- the menu: [File> Open]
- pressing the [Ctrl + O] keys
For additional explanations, see the topic Using the Open an Image Chapter of the PhotoFiltre Documentation.
Only one image can be opened by treatment.
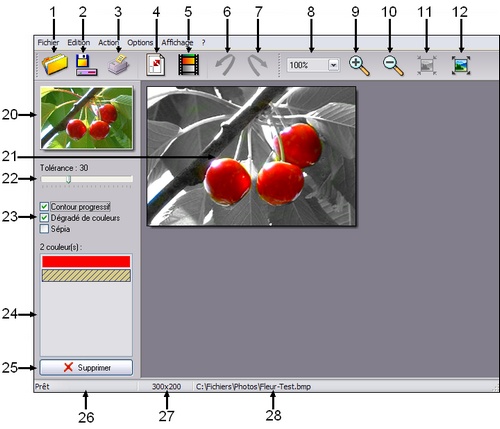
2. Save the image
This button saves the image being edited to a specific folder on your hard drive.
You can also start the function by:
- the menu: [File> Save As]
- pressing the [Ctrl + S] keys
For further explanation, see the chapter Saving an image in the PhotoFiltre documentation.
3. Print the image
This button prints the image being edited.
You can also start the function by:
- the menu: [File> Print]
- pressing the [Ctrl + P] keys
For additional explanations, see the chapter Print an image in the PhotoFiltre documentation.
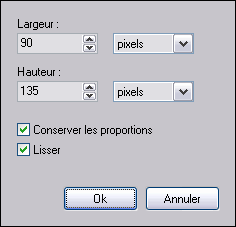
4. Size of the image
This button is used to change the dimensions of the image. Resizing can be done just after an image is opened or before it is saved. If it is done at another time, the image will return to its original size when the [Execute Processing] function is called.
You can also start the function by:
- the menu: [Action> Image size]
- pressing the [Ctrl + T] keys
Property of the Image Size function
5. Execute the treatment
This button starts the conservation processing of the selected colors.
You can also start the function by:
- the menu: [Action> Start treatment]
- pressing the [Enter] key
6. Cancel the last action
This button cancels the last action performed. To save memory, there is only one level of cancellation. When this action is applied after the [Execute Processing] function, it returns to the original image (all in color).
You can also start the function by:
- the menu: [Edit> Cancel last action]
- pressing the [Ctrl + Z] keys.
7. Repeat the last action
This button reproduces the last action performed.
You can also start the function by:
- the menu: [Edit> Repeat last action]
- pressing the [Ctrl + Y] keys
8. Display zoom
This function makes it possible to choose, by clicking on the arrow, a coefficient of enlargement or reduction of the image. Zoom ratios are defined between 33% (1: 3) and 400% (4: 1).
9. Zoom in
This button is used to enlarge the image by successive clicks. You can also start the function from the [View> Zoom In] menu.
10. Zoom out
This button reduces the image by successive clicks. You can also start the function via the [View> Zoom Out] menu.
11. Real size
By default, Photo Black & Color reduces the size of large images (zoom less than 100%) so that they are displayed entirely in the workspace. This button enlarges the images to their actual size (100% zoom). Vertical and horizontal scrollbars can then appear.
You can also start the function via the [View> Actual Size] menu.
12. Automatic zoom
This button adjusts the size of the image so that it is fully visible in the work area. Images smaller than the work area will be displayed at their actual size.
You can also start the function from the [View> Auto Zoom] menu.
20. The image thumbnail
This vignette is a reflection of the original image. You can compare it to that obtained after each use of the [Execute Processing] function.
21. The workspace
This space receives the open image. Vertical and horizontal scroll bars may be present depending on the size of the image and the current zoom.
22. The [Tolerance] parameter
The tolerance defines the color difference allowed to convert or not a pixel of the image in gray level. Values must be between 0 and 100. A low tolerance treats only pixels whose color is very close to the selected colors (see part # 24) while a high tolerance allows larger color differences.
23. Additional parameters.
[Progressive contour] option
If this box is checked, the boundary between the colored areas and the gray level areas is progressive. If the box is not checked, the limit is much clearer.
The [Gradient of colors] option
If this box is checked, Photo Black & Color adds intermediate colors during processing to take into account the color gradations between two colors to compare. For example, if the color list (part # 24) contains blue in the first position and red in the second, Photo Black & Color will add shades of purple for the color comparisons. If the box is not checked, the colors are compared as is.
The option [Sepia]
If this box is checked, the sepia color will be used as the desaturation color. Otherwise, we use the gray levels.
24. The list of colors
In this list are displayed the colors of the image to keep. The addition of a color is done by a simple click on the image (slider pipette). The maximum number of colors that can be stored is limited to 50.
25. The [Delete] button
This button removes the active color from the list.
26. Activity in progress
This field indicates the activity or actions in progress. If there is no activity, Photo Black & Color displays the word Ready .
27. Dimensions of the image
This area displays the dimensions of the image being edited. The information is displayed as follows:
[Width] x [Height]
The values are displayed in pixels.
28. Name of the image
This area displays the location and file name of the image being edited.
Principle of use
1. Open an image for partial desaturation.
To get good results, you have to choose images that have a colored main subject with different shades of the background, for example flowers, fruits or others.
2. Choose the colors to keep .
Using the [Eyedropper], click on the colors to preserve, they will be displayed in the [Color list]. In general, 3 clicks on the dark areas, 3 clicks on the intermediate areas and 3 clicks on the light areas are sufficient for a first approach.
3. Execute the treatment
Start the treatment with the corresponding button. After execution, a new image is displayed. It contains grayscale areas and areas whose colors have been preserved according to the different parameters chosen.
To refine color processing, you can do the following:
- Click on the grayscale parts to add a color that has not been preserved
- Change the value of the Parameter [Tolerance]
- Check or uncheck as necessary the boxes of [Additional Settings]
- Delete a color in the [Color list]
4. Repetition of treatment
Repeat the [Execute] phase as many times as necessary to obtain a conclusive result. The use of the [Undo last action] function is not necessary because you can work directly on the result image.
5. Saving the image
When the treatment is finished, save your image. You can use the PFI format to rework the image under PhotoFiltre using the eraser to sharpen the edges and erase the last imperfections.
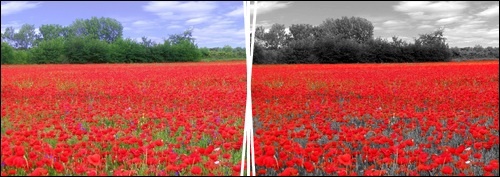
Example of partial desaturation from a landscape picture